Monday, September 27, 2010

What do ladybugs taste like?

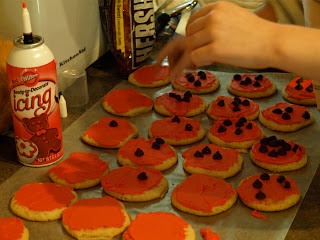
To accompany our science lesson on ladybugs, we incorporated something tasty. I'm sure there are a variety of buggy cookies you could make, but here are our red spotted friends.

Ladybug Cookies
Materials:
- Sugar cookies-make your own (math lesson!) or we used precut Pillsbury Sugar Cookies, to save on prep time.
- Chocolate Chips
Red icing (I suggested buying premixed red, using food coloring to get red is very difficult)
- Optional: black licorice for legs and antennae, black gel icing for center line detail


"I think I just ate a bug!"

Saturday, September 25, 2010

Marker my words

Mommy's creation
My 2 1/2 year old and I probably had more fun with this than Caleb did, but at least it got him drawing. Washable Window Markers are the new thing in our house. Caleb wrote his name a few times and enjoyed scribbling with his brother. We have a 5ft by 11ft window in the dining room, which worked as a great canvas for a neighborhood art show. Plus, clean-up was a breeze, and actually Caleb's favorite part- silly boy. I'm hoping that these markers will be yet another vehicle in inspiring Caleb to use his hands more, even if it's scribbling. I plan to take them in the car for long trips. Window crayons are also available.

Caleb writing his name with Washable Window Markers
By the way, we found out today that the markers wash off of skin pretty well too. Oops!
What does green taste like Sophia?

Thursday, September 23, 2010

Writing wrong, and righting the wrong

So, today we struggled all morning with writing during phonics and math, per usual. Caleb is behind on his writing skills for a few reasons. He's always hated coloring of any sort and he doesn't have very strong hand muscles, so it's hard for him to grip the pencil and push down hard enough to make a mark. I've been keeping my eyes and ears open for ideas on how to help him and I think we stumbled upon something today. There is hope!

On a whim, I nixed a subject today and decided to interject something more fun. I dug out our tabletop pocket chart, that I purchased a while back that he hadn't seen. Caleb loves constructing words and these word cards work great for phonics. For example it pairs letters to create the sounds "ch" instead of using separate letters "c" and "h". Overall it just helps with phonics. I got out the pocket chart tent to work on the words when he noticed the back of the tent has a dry erase board on it with pockets under it. At his prompting, we rotated the tent. He told me to spell out a word with our pocket chart cards and he promptly took the dry erase marker and wrote it right out! He wrote faster than I'd ever seen him and with more confidence. We took pictures because that is a major encouragement to him. The fact that the dry erase board is upright and the marker is higher contrast than a pencil were just the things he needed. The tent is stable and at just the right height for him. This activity is a definite repeat!

The pocket chart card set we use is the Smethport- Word Bits Pocket Chart Card Set. It includes a 130 double-sided cards and an activity guide.

Here is some of Caleb's handy work:
"school"
"silly"

Friday, September 3, 2010

All about me, a capsule in time

We're studying a self-awareness in Health. I couldn't find the worksheets I wanted, so I created a little booklet for Caleb to complete. The book is all about him, a bit of a capsule in time to look back on. Another project that ended up on the fridge. Thought I'd share the files. Caleb's was personalized, but the file attached is ready to be personalized for your own child.

All About Me Book
Page 1: (Front) Write your name, color a picture of yourself
Page 2: Favorite, color, toy, movie, food
Page 3: Trace your hand
Page 4: A poem
Page 5: Favorite book, best friend, favorite animal, favorite restaurant
Page 6 & 7: (Middle) "God Made Me Unique"
Page 8: Eye color, hair color, how tall, how much you weigh
Page 9: My Family (list or draw family members)
Page 10: Fingerprints (you will need an ink pad)
Page 11: Trace foot
Page 12: (Back) Date
Click here to download the book.

A preview of what the pages look like:

The pages are to be printed on normal 8.5 x 11, letter size paper. In order to properly assemble the book, the paper needs to be printed on both sides. For example pages 2 and 11 are printed on the other side of pages 1 and 12. There are 3 pieces of paper all together. Fold down the center and staple.

Click here to download the book.

It's a dirty job...


It's a dirty job, but someone's got to play in it!

My son hates to write, color or draw of any sort. He knows his letters in and out, but he just won't write them. I've been looking for ways to work around his fear of the dreaded "pencil". Waaay back when I was in 1st grade, I remember doing this exercise in school, and I remember it because I loved it! This exercise helps reinforce the mechanics of constructing the letters as well as builds hand strength. Here's what we did. I'd love other ideas too!

Shaving Cream Alphabet
Materials needed: a finger and 
shaving cream (the foam kind, I do not suggest the gel) or whipped cream
Optional materials:
alphabet flash cards (for a visual aid)
Directions: Simply learn to write the letters using your finger instead of using a writing utensil. And remember, get messy!


Looking back on my own experience with this project as a child, my 1st grade teacher was a brave woman for having a class full of kids doing this on their desks! We had the luxury of using our kitchen table, next to our kitchen sink!

Wednesday, September 1, 2010

A splash of color on the first day

So it's been too long since I've posted, but today was the official start of our journey. Caleb's first day of homeschool, Kindergarten. He had a blast, more than that, he was soooo proud of himself. So proud that he even wanted to call grandma and tell her about his accomplishments. Of course I'm beaming with pride, he tackled all his work today with more confidence than I've ever seen from him. Writing, drawing and any sort of craft has always repelled him in a way I could never understand myself, coming from an art and creative writing background. But today...he had me smiling. As a bonus, I had fun, and I had way more patience than expected. I'm sure this is just a honeymoon stage. I'll enjoy it while it lasts. I'll share the art project we did, it is yours for the using, I created the worksheets myself.

Our First Art Lesson
First we studied some basic primary and secondary color information I found at lessonsnips.com click here to download.
After getting down the basics, he painted his own wheel using the colored worksheet for reference. The finished product is now on display on our Frigidaire (also pictured below).
Painting the Color Wheel Project
Download the colored color wheel guide here
And the blank color wheel to paint or color here
Materials needed: the above handouts, washable paints, kid's paintbrush, craft smock (to stay clean)

 
Homeschool Top Sites - Best Homeschool Sites on the Internet
Homeschooling Blogs
Powered By Ringsurf
Homeschool Gold